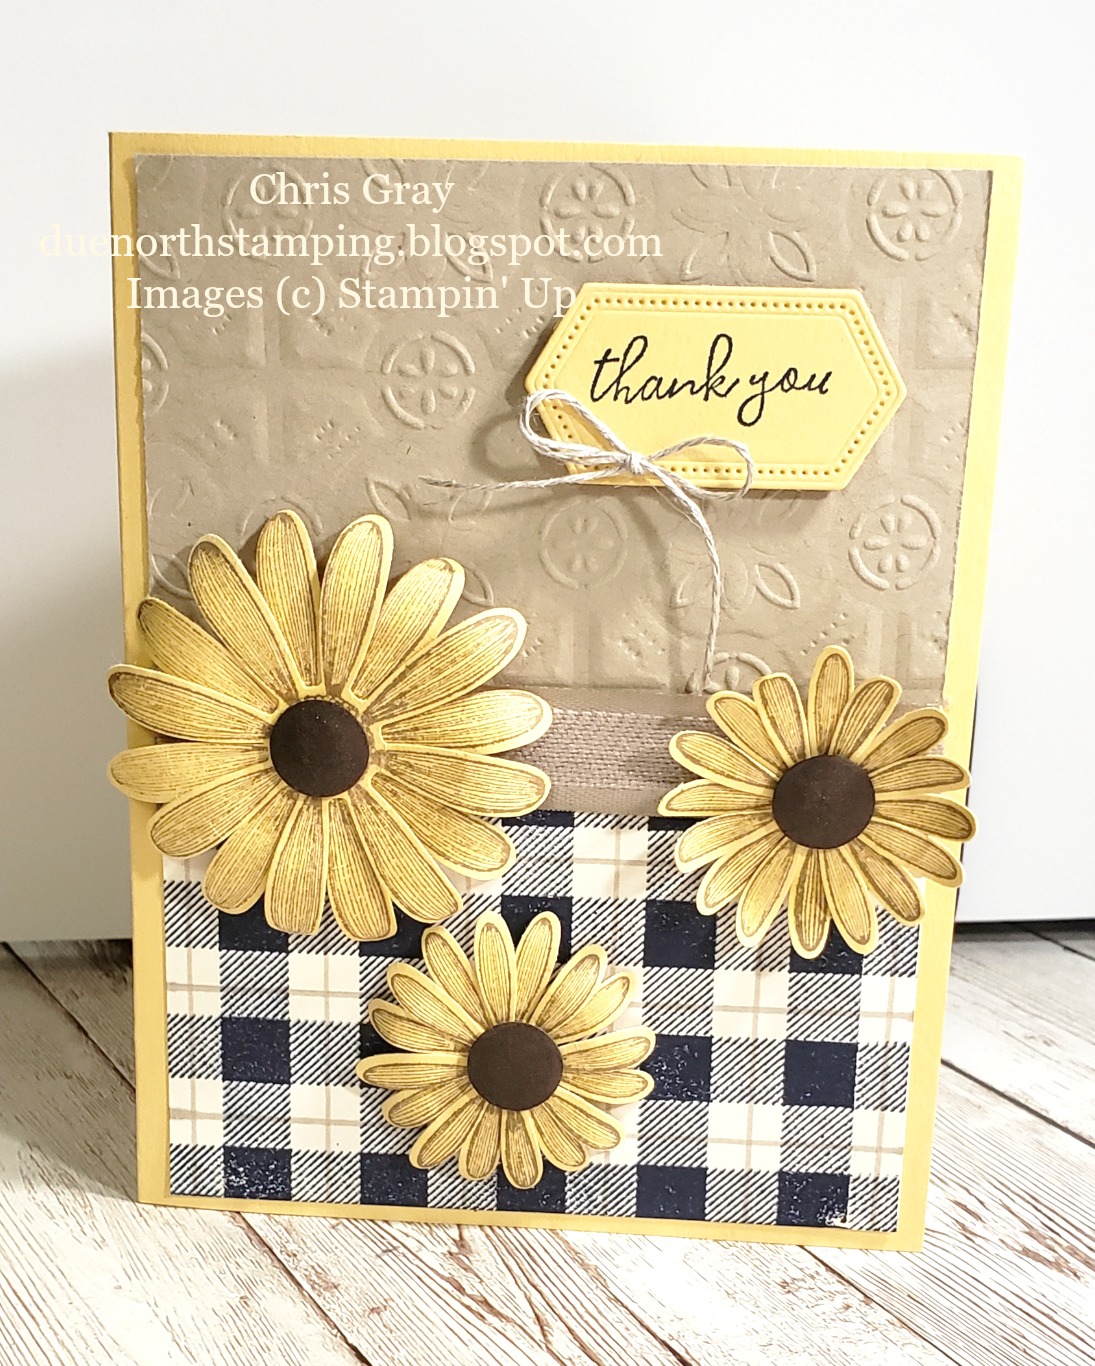
Do you sometimes wonder how to make your daisies look more realistic and
like they are popping off the page? I am going to share a technique that
I use, CASEing it from YouTube.
To make this card, you will need the following ingredients:
Stamps: Daisy Lane, Free as a Bird, Buffalo Check
Ink: Crumb Cake, Night of Navy
Cardstock:
So Saffron, Crumb
Cake, Very Vanilla, Soft Suede
Accessories:
Daisy medium and large
punches, Tin Tile Dynamic embossing folder, Stitched Nested Labels die, Linen thread, Crumb Cake Stampin'
Write marker, So Saffron and Mossy Meadow Stampin' Blends, Crumb Cake ribbon
with satin edge, adhesives and Stampin Dimensionals, 1/2" circle punch,
Very Vanilla envelope
Dimensions:
So Saffron – 8 1/2" x 5 1/2" and scraps for cutting out sentiment
and daisies
Crumb Cake – 2 3/4" x 4"
Very Vanilla – 5" x 4 1/4" and also 2 1/2" x 4"
(allow for a little overlap)
Basic Instructions:
1. Cut and fold card base.
Stamp two
small daisies and stems on inside Very Vanilla layer and color as desired with
Blends.
Adhere to inside of card.
2. Run Crumb Cake layer through Tin Tile embossing folder.
Stamp Very Vanilla layer with Buffalo Check
stamp using Night of Navy ink.
Use Crumb
Cake marker to draw plaid pattern using a ruler.
Adhere both layers to front of card, overlapping
slightly.
Cut a piece of the Crumb Cake
ribbon long enough to cover the seam and adhere using Tear & Tape or
glue.
3. Stamp sentiment onto So Saffron cardstock and cut out using smallest
Stitched Nested Labels die.
4. Stamp 2 large and 4 medium daisies onto So Saffron cardstock using Crumb
Cake ink.
Punch out.
Curl the petals for the large daisy and one
of the small daisies under using a bone folder, being careful not to rip the
petals off.
Curl the petals for the
other daisy upward to add a little more interest.
Punch out using Soft Suede cardstock 3
circles using the 1/2" circle punch.
Using the rounded end of the Paper Piercing tool and the mat, start in
the center of the circles and make small circles to make the circle look
mounded up.
5. Adhere the daisies together, using two to make one flower, making sure the
petals are offset.
Adhere the center
using a dimensional.
Adhere the daisies
to the card front as desired using dimensionals stacked on one another to raise
the downturned daisies up from the page so they don't flatten out.
Adhere the upturned daisy using one
dimensional.
Adhere the daisies to the card front as
desired.
Adhere sentiment to upper right
of card.
Add a small bow made from the
linen thread to the bottom left of the sentiment.
6. Stamp and color some small daisies on to the envelope either on the flap or
on the front of the envelope as desired.
Remember, NO NAKED ENVELOPES!
I hope you like this card.
It is very
versatile and would be appropriate for a Thank You, Get Well, Sympathy, Birthday,
or just a Thinking of You card.
WHAT'S GOING ON?
Check out the details here:
- Check out the Paper Pumpkin monthly kit - subscribe today - click here: PAPER PUMPKIN
- Click here to see the BIG CATALOG:
Thanks for stopping by and I hope you have a wonderful day!
Chris